Monday, 23 May 2011

How to setup a webcam on your website

Setup a webcam on a website
In 1991, the computer sciences nerds at Cambridge University where tired of walking 2 floors up to the cafeteria and finding and empty coffee pot. They interfaced a camera to a computer on the network, this way they could remotely check the status of the coffee pot. The first webcam was born.

It's so easy to put a webcam online today, on any type of website. You may want to setup a webcam to stream the video online in the following scenarios:
  • There is something worth seeing on your backyard.
  • You want to keep an eye on a child or a pet.
  • You are running a really cool experiment, the whole world should be interested.
  • Traffic cam, security cam...

First setup the webcam to capture the video you need.
  1. Connect the webcam to a computer running a video capture & http server software, such as Zone Trigger software.
  2. In Zone Trigger, connect to the camera, go in the setting and activate the HTTP server mode.
  3. If you have a firewall at home, you might need to configure it so that it forwards the http port for incoming connections. If this step isn't very clear for you, please check out this guide to setup a home web server.

That's it! Now you can connect directly to your computer, from anywhere on the Internet, using any web browser.

But what if I already have a website on my ISP'server (or elsewhere) and I want to integrate my home webcams to it? Can this be done?

Sure.

On your website, add a "live camera" link to your home computer (or router). You can also directly integrate the image of the webcam to the page, so it becomes seamless for the user.

Here is an example for a simple link to an image, put it in an IMG html tag:
src="http://74.57.236.239/Cam1.jpg"

If you need more info about how to setup such a link, how to get your computer's IP, or how to get a fix address for your computer, check out this a HTTP how-to guide.

The default port for http is 80. Note that some ISPs do not allow home computers to host on certain ports for security reasons. Just host on another port, like 90 or 8080. In this case, the link to your computer should include the port number, like this:
src="http://74.57.236.239:8080/Cam1.jpg"

Such a server will probably not blow your monthly bandwidth limit since it does not stream video when no one is watching. But if you have a limit, keep an eye on your limit anyway...

Button line: it's cheap and easy to setup, it's at anyone's reach and it gives an edge to your site. Use it to establish trust with you clientele by showing them the backstage of your operation, or to provide real-time proof in the progression of an experiment. Simple, effective, trustworthy.

Wednesday, 18 May 2011

Photo Finish for FlyBall

I had never heard of Flyball until Dave contacted me a while back. He emailed me because he had a few questions about how best to proceed for his project.

Flyball is a dog sport in which teams of dogs race against each other from a start/finish line, over a line of hurdles, to a box that releases a tennis ball to be caught when the dog presses the spring loaded pad, then back to their handlers while carrying the ball. Flyball is run in teams of four dogs, as a relay. -Wikipedia

The dogs are really fast. The competitors are serious about performance. The race clock has 3 decimal digits, every fraction of a second counts. Getting a good timing when relaying the dogs is critical; Ideal running is nose-to-nose at the start line.

Dave had the idea of using Webcam Zone Trigger's motion detection system to generate a photo-finish at the start line, this could be used as a training tool to get better relay times. The main question was how to get reasonable images fast enough for a photo finish.

Most webcams can't get more than 30 frames per seconds. An exposure of 1/30th of a second makes for a blurry image when the dog is speeding by. First thing I suggested was to make sure there was a decent contrast between the dog and the background, this way the webcam would have a better chance. Good lighting will help in both the contrast and the camera's framerate.

We talked about which camera would do the job best. From my previous tests, I knew that a USB DSLR camera would not release fast enough, so I recommended against that. Since Zone Trigger does the motion detection on live frames, it can save the exact frame on which is has detected motion, which is ideal. The issue was to find a camera that provides a stable and fast framerate.

Dave tried out the PS3 Eye camera, which has a driver available for Windows. It turns out that it provided some decent results. The images where blurry, not good enough to hang on your wall, but good enough to get reliable motion detection.


"I used Zone Trigger today to get some captures. From a trigger standpoint, it worked flawlessly. 100% reliable and no false triggers! That’s pretty amazing, given how fast the dogs are going (1 ft per 50 msec)." -Dave

Thank you, Dave, for the great project!
Go for the gold!

Wednesday, 11 May 2011

Laser tripwire using webcams

Just in case you though these where just for spy and heist movies, Laser trip wires actually exist and are common in high tech security systems. The principle is so simple that it can quite easily be ported at home. Tripwires are better than conventional detection for a few reasons:
  • Precise, reliable, fast detection
  • Works day & night, super useful at night.
  • Supports many tripwires
However, here is the drawbacks: Since the webcam is dedicated to monitoring laser beams, it may not be useful for taking pictures. But this may not be a problem if the goal of the system is to ring an alarm, run a program, output a signal, log the breach... all things that can be taken care of by the webcam software.

This method can be used for security, but also for games, interactive art, science experiments, statistics...

There are mainly 3 ways of making a cheap custom system of trip wires with webcams:


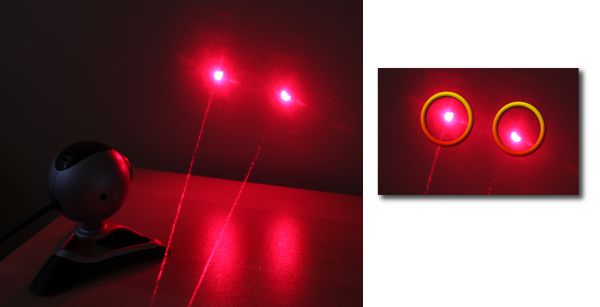
Use Direct Lasers

You can get cheap laser pointers anywhere. So just set one up to shoot directly in the webcam. Most laser pointers output only 1 millwatt so there is little risk this will fry the sensor. However, make sure you aren't shooting with a 150 milliwatt pointer.


Note: Shooting a laser directly in the camera has 2 major drawbacks:
-Laser needs to be aimed perfectly
-Laser will scatter in the webcam lens, blinding it from anything else.


Use Reflected Lasers


Here is when the Webcam Zone Trigger software comes in handy. Because it uses hot spots, you shoot the laser on a reflective surface, then aim the camera there, and setup hot spots to detect each beam independently.


Use Normal Lights Spots


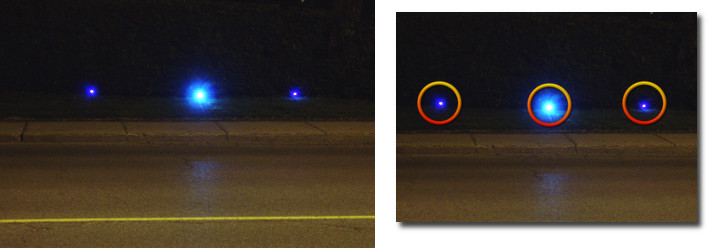
Webcam have a huge advantage over laser sensors: webcams see the whole picture. So we can basically create the same tripwire effect without the lasers. If you setup light sources that emit a bright spot of light, then aim the camera that way, then setup hot spots over the light source, anything moving between the light and the camera will generate a trig.


Optimize the camera for optimal tripwire performance

We need fast framerate.
We don't need good image quality.

Using the webcam motion detection software, connect to the camera using a low resolution 320x240. Then go to the Video Advanced settings for the webcam.

This setting window is different for each webcam model, depending on the webcam's hardware features. Webcams always try to get the best images possible, which mean they tune the amount of time it spends on each frame in order to get enough light. The idea here is to tell the webcam that we only care about speed. So try to tune the camera to reduce the exposure time for each image by disabling the "Auto exposure" and setting it to get a faster framerate.


Good luck with your tripwire project!


Sunday, 8 May 2011

Two things for reliable motion detection

You are using webcams for a computer vision project. Your project may require good image quality if you are saving the live images, but also you may not care about the quality of the images as long as you get reliable motion detection. Here are the two most important things you can do to get reliable motion detection...

Light

Most webcams, even good models, take a dramatic performance hit in low light. They spend more time exposing for each frame, which reduces the amount of frame per seconds sent to the computer. It will also increase the voltage in the video sensor to make it more sensitive, which has the side-effect of producing noisy images (the live video will be grainy). Still, this may not be enough to get clear images; if the scene if not sufficiently light, the camera will provide a noisy, dark gray/brown-ish image.

Low-contrast, noisy images make for a very poor start for motion detection. The processing can only be as good as the source images.

Good Light / Low Light

You don't need to light up the whole scene, just the area of interest. The keyword here is contrast. For the software to see motion, there must be a clearly visible change on the image.

Hot Spots

Don't run the motion detection on the whole image, especially if the image is noisy. Target a strategic zone on the image, the smaller the better. This way you can set the motion detection hot spot's sensitivity to be just right.

Pick a zone on the image that is sufficiently light, and that will yield a clear contrast when the motion occurs.

Put the Hot Spot over a strategic zone

The weird thing is that very few motion detection software use hot spots. Here is a tip: check out Webcam Zone Trigger, download the webcam software here.